
Applying for a Turkish eVisa is nowhere near as complicated as I expected. I've done my fair share of visa applications over the years (some smoother than others), and this one? Genuinely one of the easiest, as long as you don't overthink it.
Still, there are a few details that can trip people up if they're not careful—so I figured I'd write this guide based on my own experience, with zero jargon and no unnecessary fluff.
If you're planning a trip to Turkey soon and wondering how the eVisa thing works, here's a step-by-step breakdown, with a few tips I wish someone had told me before I applied.
Step 1: Check if You Actually Need an eVisa
Before you Apply for Turkey Visa, take two minutes to check if you need one. Not all nationalities do. Some travelers can enter Turkey visa-free, and others might need to go through a longer consular process instead of the eVisa.
I'm from a country that does qualify for the eVisa (lucky me), but I nearly skipped this step assuming it was mandatory for everyone. It's not. So make sure you're not doing extra work unnecessarily.
Step 2: Get Your Passport Ready
This sounds obvious, but you'd be surprised how many people apply without even glancing at their passport's expiration date. Your passport needs to be valid for at least 6 months from the date you plan to arrive in Turkey.
I also recommend having a digital copy or photo of your passport page on hand. You won't always need to upload it, but having it in front of you makes it easier to fill in your details accurately. One wrong digit on your passport number? Yep, that can mess up your application.
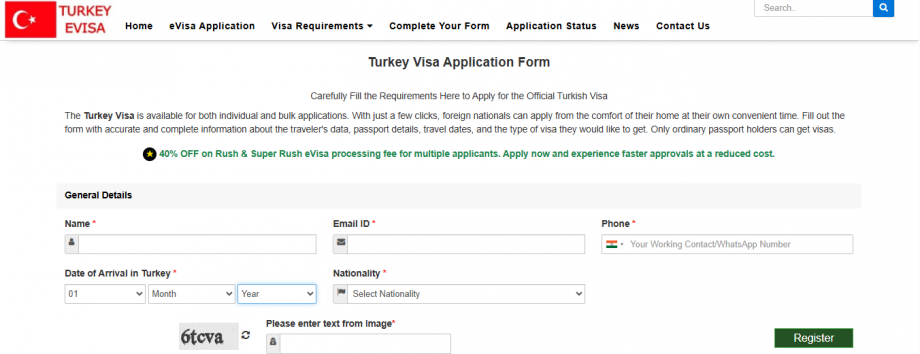
Step 3: Start the Application Online
The Turkey Visa Application Form is straightforward and takes maybe 10 minutes total. You'll be asked to enter:
- Your full name (exactly as it appears on your passport)
- Passport number and expiration date
- Date and place of birth
- Nationality
- Your planned date of entry into Turkey
One thing I appreciated was that the form is clean and easy to understand. No weird phrasing or confusing legal language. It's written like a normal person would write it—which, honestly, is rare for government-related processes.
Just don't do what I did and multitask while filling it out. I had Netflix on in the background, accidentally flipped two numbers in my passport field, and had to redo the whole thing. Rookie move.
Step 4: Review and Submit
Once everything's filled in, you'll land on a summary page. Take your time here—this is your chance to catch any mistakes.
The website won't stop you from submitting a passport number that's wrong by one digit or a name that's slightly off. It's all on you. And if your eVisa comes back with an error, it's on you to fix it (which might mean reapplying and paying again).
So read carefully, double-check everything, then hit submit.
Step 5: Payment and Confirmation
After submitting your details, you'll be asked to pay the Visa Fees. It's a secure process, and you can use a debit or credit card. I paid with a regular Visa card, no issues at all. Once payment goes through, you should receive a confirmation email pretty quickly. In my case, the eVisa showed up in my inbox within 15 minutes. I've heard some people say it took an hour or two, especially during peak travel seasons, but overall it's fast.
Step 6: Download and Print Your eVisa
Even though your visa is technically linked to your passport electronically, print it out anyway. I can't stress this enough.
Some airlines will ask to see it at check-in, and Turkish immigration might want to verify it as well. I always travel with both a hard copy and a digital one saved on my phone, just in case.
Travel tip: throw the paper copy in your passport holder or travel wallet so you don't forget it on departure day.
A Few Bonus Tips from Me to You:
- Apply a few days in advance. Don't leave this until the night before your flight. The process is quick, but things happen—emails get stuck in spam, cards don't go through, etc.
- Don't overstay your welcome. The eVisa lets you stay in Turkey for a limited time (usually 30 or 90 days depending on your nationality). If you go over that, you could face fines or get flagged for future entries.
- Use the same passport. If you hold more than one, make sure you travel on the passport you used for your application. This sounds simple, but dual nationals have definitely been caught out by it.
- Save a copy somewhere you can access abroad. I email mine to myself and save it in Google Drive just in case I lose my luggage or phone while traveling. Better safe than stuck.
Final Thoughts
I'll be honest—Turkey had been on my travel wishlist for years, but the idea of dealing with visa stuff always felt like a hassle. After going through the eVisa process, I can say with confidence: it's nothing to stress about.
If you follow the steps, check your details carefully, and apply a few days ahead of time, you'll be all set. Then you can move on to the fun part—planning your route, your food stops (you have to try menemen), and all the historic spots you're going to see.


